lcu_driver RuntimeError Event loop is closed

通过lcu_driver查询战绩一直报错

后通过查询发现原来是python 3.8后 asyncio默认事件循环出现了问题。

通过修改源码中的connector,在第16行加入下方代码

1
asyncio.set_event_loop_policy(asyncio.WindowsSelectorEventLoopPolicy())
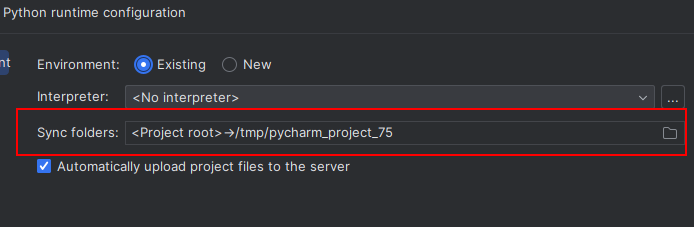
image-20230827164712049

windows安装dlib

安装cmake以及Visual Studio 2022

之后pip install dlib以及face_recognition 就可以

可能还需要安装boost

pycharm远程调试python程序

常规链接远程ssh发现无法调试程序

出现错误

1
Cannot find remote credentials for target config com.jetbrains.plugins.remotesdk.target.webDeploymen

这里其实是因为在创建环境的时候,没有选择对路径

一定要修改,这个sync folders到文件路径才可以进行同步

image-20230721155515830

GLIBCXX_3.4.20 not found

安装各式各样的东西都有可能出现/lib64/libstdc++.so.6: version GLIBCXX_3.4.20 not found这个报错

解决方案如下所示

1
2
3
4
5
6
7
8
9
10
11
12
13
14
15
16
17
18
19
20
21
22
23
24
25
26
27
28
29
30
31
32
33
34
35
36
37
38
39
40
41
42
43
44
45
46
47
48
49
50
51
52
53
54
55
56
57
58
59
60
61
62
63
64
1. 查看系统版本
strings /usr/lib64/libstdc++.so.6 | grep GLIBCXX
GLIBCXX_3.4
GLIBCXX_3.4.1
GLIBCXX_3.4.2
GLIBCXX_3.4.3
GLIBCXX_3.4.4
GLIBCXX_3.4.5
GLIBCXX_3.4.6
GLIBCXX_3.4.7
GLIBCXX_3.4.8
GLIBCXX_3.4.9
GLIBCXX_3.4.10
GLIBCXX_3.4.11
GLIBCXX_3.4.12
GLIBCXX_3.4.13
GLIBCXX_3.4.14
GLIBCXX_3.4.15
GLIBCXX_3.4.16
GLIBCXX_3.4.17
GLIBCXX_3.4.18
GLIBCXX_3.4.19
GLIBCXX_DEBUG_MESSAGE_LENGTH

发现少了GLIBCXX_3.4.20,解决方法是升级libstdc++.

2.
sudo yum provides libstdc++.so.6
Loaded plugins: fastestmirror, langpacks
Determining fastest mirrors
libstdc++-4.8.5-39.el7.i686 : GNU Standard C++ Library
Repo : base
Matched from:
Provides : libstdc++.so.6

3.
cd /usr/local/lib64
# 下载最新版本的libstdc.so_.6.0.26
sudo wget http://www.vuln.cn/wp-content/uploads/2019/08/libstdc.so_.6.0.26.zip
unzip libstdc.so_.6.0.26.zip
# 将下载的最新版本拷贝到 /usr/lib64
cp libstdc++.so.6.0.26 /usr/lib64
cd /usr/lib64
# 查看 /usr/lib64下libstdc++.so.6链接的版本
ls -l | grep libstdc++
libstdc++.so.6 ->libstdc++.so.6.0.19
# 删除/usr/lib64原来的软连接libstdc++.so.6,删除之前先备份一份
sudo rm libstdc++.so.6
# 链接新的版本
sudo ln -s libstdc++.so.6.0.26 libstdc++.so.6
# 查看新版本,成功
strings /usr/lib64/libstdc++.so.6 | grep GLIBCXX
...
GLIBCXX_3.4.18
GLIBCXX_3.4.19
GLIBCXX_3.4.20
GLIBCXX_3.4.21
GLIBCXX_3.4.22
GLIBCXX_3.4.23
GLIBCXX_3.4.24
GLIBCXX_3.4.25
GLIBCXX_3.4.26
GLIBCXX_DEBUG_MESSAGE_LENGTH
...

centos yum更新失败

1
2
3
4
5
6
7
8
9
10
11
12
13
14
15
16
17
18
19
20
21
22
23
24
25
26
27
28
29
30
31
32
33
34
35
36
37
38
39
40
41
42
43
44
45
46
47
bash-4.2# sudo yum makecache
Loaded plugins: fastestmirror, ovl
Determining fastest mirrors

base: mirrors.aliyun.com
extras: mirrors.aliyun.com
updates: mirrors.aliyun.com
base | 3.6 kB 00:00
extras | 2.9 kB 00:00
https://dl.bintray.com/tigervnc/stable/el7/RPMS/repodata/repomd.xml: [Errno 14] curl#6 - "Could not resolve host: dl.bintray.com; Unknown error"
Trying other mirror.
One of the configured repositories failed (TigerVNC-el7),
and yum doesn't have enough cached data to continue. At this point the only
safe thing yum can do is fail. There are a few ways to work "fix" this:

applescript
Copy

1. Contact the upstream for the repository and get them to fix the problem.

2. Reconfigure the baseurl/etc. for the repository, to point to a working
upstream. This is most often useful if you are using a newer
distribution release than is supported by the repository (and the
packages for the previous distribution release still work).

3. Run the command with the repository temporarily disabled
yum --disablerepo=tigervnc-el7 ...

4. Disable the repository permanently, so yum won't use it by default. Yum
will then just ignore the repository until you permanently enable it
again or use --enablerepo for temporary usage:

yum-config-manager --disable tigervnc-el7

or
subscription-manager repos --disable=tigervnc-el7

5. Configure the failing repository to be skipped, if it is unavailable.
Note that yum will try to contact the repo. when it runs most commands,
so will have to try and fail each time (and thus. yum will be be much
slower). If it is a very temporary problem though, this is often a nice
compromise:

yum-config-manager --save --setopt=tigervnc-el7.skip_if_unavailable=true

failure: repodata/repomd.xml from tigervnc-el7: [Errno 256] No more mirrors to try.
https://dl.bintray.com/tigervnc/stable/el7/RPMS/repodata/repomd.xml: [Errno 14] curl#6 - "Could not resolve host: dl.bintray.com; Unknown error"

在用centos的时候,更换yum源,在创建新缓存的时候报错。

这里直接禁用tigervnc-el7即可yum-config-manager --disable tigervnc-el7之后重新创建即可

CentOS Docker 安装

CentOS Docker 安装

Docker 支持以下的 64 位 CentOS 版本:

  • CentOS 7
  • CentOS 8
  • 更高版本…

使用官方安装脚本自动安装

安装命令如下:

1
curl -fsSL https://get.docker.com | bash -s docker --mirror Aliyun

手动安装

卸载旧版本

较旧的 Docker 版本称为 docker 或 docker-engine 。如果已安装这些程序,请卸载它们以及相关的依赖项。

$ sudo yum remove docker
docker-client
docker-client-latest
docker-common
docker-latest
docker-latest-logrotate
docker-logrotate
docker-engine

安装 Docker Engine-Community

使用 Docker 仓库进行安装

在新主机上首次安装 Docker Engine-Community 之前,需要设置 Docker 仓库。之后,您可以从仓库安装和更新 Docker。

设置仓库

安装所需的软件包。yum-utils 提供了 yum-config-manager ,并且 device mapper 存储驱动程序需要 device-mapper-persistent-data 和 lvm2。

$ sudo yum install -y yum-utils
device-mapper-persistent-data
lvm2

使用以下命令来设置稳定的仓库。

使用官方源地址(比较慢)

$ sudo yum-config-manager
–add-repo
https:**//download.docker.com/linux/centos/**docker-ce.repo

可以选择国内的一些源地址:

阿里云

$ sudo yum-config-manager
–add-repo
http:**//mirrors.aliyun.com/docker-ce/linux/centos/**docker-ce.repo

清华大学源

$ sudo yum-config-manager
–add-repo
https:**//mirrors.tuna.tsinghua.edu.cn/docker-ce/linux/centos/**docker-ce.repo

安装 Docker Engine-Community

安装最新版本的 Docker Engine-Community 和 containerd,或者转到下一步安装特定版本:

1
$ sudo yum install docker-ce docker-ce-cli containerd.io docker-compose-plugin

如果提示您接受 GPG 密钥,请选是。

有多个 Docker 仓库吗?

如果启用了多个 Docker 仓库,则在未在 yum install 或 yum update 命令中指定版本的情况下,进行的安装或更新将始终安装最高版本,这可能不适合您的稳定性需求。

Docker 安装完默认未启动。并且已经创建好 docker 用户组,但该用户组下没有用户。

要安装特定版本的 Docker Engine-Community,请在存储库中列出可用版本,然后选择并安装:

1、列出并排序您存储库中可用的版本。此示例按版本号(从高到低)对结果进行排序。

$ yum list docker-ce –showduplicates | sort -r

docker-ce.x86_64 3:18.09.1-3.el7 docker-ce-stable
docker-ce.x86_64 3:18.09.0-3.el7 docker-ce-stable
docker-ce.x86_64 18.06.1.ce-3.el7 docker-ce-stable
docker-ce.x86_64 18.06.0.ce-3.el7 docker-ce-stable

2、通过其完整的软件包名称安装特定版本,该软件包名称是软件包名称(docker-ce)加上版本字符串(第二列),从第一个冒号(:)一直到第一个连字符,并用连字符(-)分隔。例如:docker-ce-18.09.1。

1
$ sudo yum install docker-ce-<VERSION_STRING> docker-ce-cli-<VERSION_STRING> containerd.io

启动 Docker。

1
$ sudo systemctl start docker

通过运行 hello-world 镜像来验证是否正确安装了 Docker Engine-Community 。

1
$ sudo docker run hello-world

卸载 docker

删除安装包:

1
yum remove docker-ce

删除镜像、容器、配置文件等内容:

1
rm -rf /var/lib/docker

docker安装clash

有的代理发现跑在clash for linux上节点全部超时,于是找了台服务器用shellclash跑了一下,发现是正常的。

所以问题其实出在了clash for linux上,但是shellclash用docker跑有点复杂,于是找了一下docker直接跑clash的教程。

找到了这一篇使用 Docker 搭建图形化 Clash 服务端并添加订阅

不错!

首先找到一个文件夹用来存放配置文件

这里我找的是/home/clash,我将不同的配置文件分别命名成config1.yaml等

之后启动容器

1
docker run -d --name=clash1 -v '/home/clash/config1.yaml:/root/.config/clash/config.yaml' -p 7899:7890 -p 9099:9090 --restart=unless-stopped dreamacro/clash

7899就是代理的端口

9099就是ui面板的端口

这里可以用外部提供的链接http://yacd.haishan.me/访问ui

也可以自己搭建

1
docker run -p 1234:80 -d --rm --name yacd haishanh/yacd

1234就是访问的端口

之后操作ui界面即可