go+vue实现掘金小册阅读

之前通过爬虫采集了一些掘金小册的内容,当时只保存了对应的html。

一直希望可以找个开源的项目将掘金小册展示出来供自己阅读,但是翻遍了GitHub都没有找到我喜欢的。

所以只能自己开发。

技术选取

本来是想要用python+html实现一个简单的页面:当时的构思是用fastapi构建接口,然后利用html+jquery+bootstrap实现前端页面。

但是感觉都2023年了还是这样实现有点low,然后因为工作有点忙以及需要打游戏,就搁置了。

但是最近又想要实现这个项目了。

这次选取的是利用go实现接口,然后用vue构建前端页面。

接口

大概实现了注册,登录,获取所有图书信息,获取单独图书信息,获取文章详情这几个接口

获取所有图书信息

  • 请求方式:GET
  • URL:/books
  • 描述:用于获取所有图书的信息
  • 返回数据格式:
    • [{“book_name”:””, “book_id”:””, “article_count”:””, “tag”:””}]

分页获取图书信息

  • 请求方式:GET
  • URL:/books?page={page_number}
  • 描述:用于分页获取图书的信息,每页返回10条数据
  • 参数:
    • page_number (必需):页码,表示需要获取的页数
  • 返回数据格式:
    • [{“book_name”:””, “book_id”:””, “article_count”:””, “tag”:””}]

获取书籍详情

  • 请求方式:GET
  • URL:/book?book_id={book_id}
  • 描述:用于获取特定书籍的详细信息
  • 参数:
    • book_id (必需):书籍ID,表示需要获取的书籍的唯一标识
  • 返回数据格式:
    • {“book”:{“book_name”:””, “book_id”:””, “article_count”:””, “tag”:””}, “article”:[{“id”: 1,”book_id”: “”,”title”: “”,”content”: “”,”num”: 1 }]}

获取文章详情

  • 请求方式:GET
  • URL:/article?article_id={article_id}
  • 描述:用于获取特定文章的详细信息
  • 参数:
    • article_id (必需):文章ID,表示需要获取的文章的唯一标识
  • 返回数据格式:
    • {“id”:””, “book_id”:””, “title”:””, “content”:””, “num”: “”}

登录

  • 请求方式:POST
  • URL:/login
  • 描述:用于登录,设置cookie
  • 参数:
    • username (必需):用户名
    • password (必需):用户密码

注册

  • 请求方式:POST
  • URL:/register
  • 描述:用于注册
  • 参数:
    • username (必需):用户名
    • password (必需):用户密码

前端

这里我选择的是利用vue cli创建项目,然后通过axios构建请求获取数据。

踩坑

  1. 一个很难受的坑就是跨域请求。这里是问了一下做前端的同事,然后他跟我说用proxy代理解决。但是我设置代理后,发现response会返回set-cookie,但是浏览器并没有设置,最后发现是我的cookie设置有问题

    1
    2
    3
    4
    5
    cookie := &http.Cookie{
    Name: "auth",
    Value: cookieValue,
    Expires: time.Now().Add(24 * time.Hour), // 设置Cookie过期时间
    }

    这里我没有加Path以及HttpOnly,然后就设置不上去,加上后就可以了。

vue3使用entries错误

修改tsconfig.json

1
2
3
4
5
6
7
8
9
10
11
12
13
14
15
16
17
18
19
20
21
{
"extends": "@vue/tsconfig/tsconfig.web.json",
"include": ["env.d.ts", "src/**/*", "src/**/*.vue"],
"compilerOptions": {
"baseUrl": ".",
"paths": {
"@/*": ["./src/*"]
},
"lib": [
"es2017",
"DOM"
]
},

"references": [
{
"path": "./tsconfig.config.json"
}
]
}

增加

1
2
3
4
"lib": [
"es2017",
"DOM"
]

vue 随着父组件的值发生改变,子组件的值该怎么改变?

在做 Vue 案例的时候,突然发现父子组件传不了值了,真就是各种试都传不了值。

1
2
3
4
5
6
7
8
9
10
11
12
13
14
15
16
17
18
19
20
21
22
23
24
25
26
27
28
29
30
31
32
33
34
35
36
37
38
39
40
41
42
43
44
45
46
47
48
49
50
51
52
53
54
55
56
57
58
59
60
61
62
63
64
65
66
67
68
69
70
71
72
73
74
75
76
77
78
79
80
81
82
83
84
85
86
87
88
89
90
91
92
93
94
95
96
97
98
99
100
101
102
103
104
105
106
107
108
109
110
111
112
113
114
115
116
117
118
119
120
121
122
123
124
125
126
127
128
129
130
131
132
133
134
135
136
137
138
139
140
141
142
143
144
145
146
147
148
149
150
151
152
153
154
155
156
157
158
159
160
161
162
163
<!DOCTYPE html>
<html lang="en">
<head>
<meta charset="UTF-8">
<title>Title</title>
<meta name="viewport" content="width=device-width,initial-scale=1.0,maximum-scale=1.0,minimum-scale=1.0,user-scalable=no">
<script src="https://unpkg.com/vue@next"></script>
<style>
* {
margin: 0;
padding: 0;
}
ul li {
list-style: none;
}
#app {
position: absolute;
top: 0;
left: 0;
right: 0;
bottom: 0;
display: flex;
flex-direction: column;
}
.header {
flex: 1;
position: absolute;
height: 5%;
text-align: center;
width: 100%;
}
.footer {
flex: 1;
height: 5%;
position: absolute;
bottom: 0;
left: 0;
right: 0;
}
.footer ul {
display: flex;
}
.footer ul li {
flex: 1;
background: white;
display: flex;
justify-content: center;
align-items: center;
}
.shoplist {
position: absolute;
margin-top: 2rem;
overflow: auto;
height: 90%;
}
.shoplist ul li div img {
width: 10rem;
height: 10rem;
}
.shoplist ul {
display: flex;
flex-wrap: wrap;
justify-content: center;
}
</style>
</head>
<body>
<div id="app">
<shoptitle :ifshowShopInfo="ifshowShopInfo"></shoptitle>
<shoplist @ifshowshopinfo="getshow"></shoplist>
<footerlist></footerlist>
</div>
<script>
const app = Vue.createApp({
data() {
return {
ifshowShopInfo: ''
}
},
methods: {
getshow(data){
this.ifshowShopInfo = data
}
}
})
app.component("shoptitle", {
props: {
ifshowShopInfo: {
type: Object
}
},
template: `<div class="header" @click="djbtn">
<h2 v-if="!ifshowShopInfo">主页</h2>
<h2 v-if="ifshowShopInfo">商品详情页</h2>
</div>`,
data(){
return{
ifshow: this.ifshowShopInfo ""
}
},
methods: {
djbtn(){
console.log(this.ifshowShopInfo)
}
},
computed: {
getBoolean:function (){

}
}
})
app.component("shoplist", {
data() {
return {
shoplist: [
{name: "德芙",price: "¥69.90",src: "df.jpg"},
{name: "德芙",price: "¥69.90",src: "df.jpg"}
],
ifshowShopInfo: false,
shopInfo: {name: "德芙",price: "¥69.90",src: "df.jpg"}
}
},
methods: {
showShopInfo(){
this.ifshowShopInfo = true
this.$emit("ifshowshopinfo",this.ifshowShopInfo)
}
},
template: `<div class="shoplist">
<ul>
<li v-for="(item,index) in shoplist" :key="index" v-if="!ifshowShopInfo" @click="showShopInfo">
<div><img :src="item.src" alt=""></div>
<div>{{item.name}} <span>{{item.price}}</span></div>
</li>
</ul>
<div v-if="ifshowShopInfo">
<img :src="shopInfo.src" alt="">
<p>{{shopInfo.name}} <span>{{shopInfo.price}}</span></p>
</div>
</div>`
})
app.component("footerlist", {
data() {
return {
footerlist: [1,2,3,4]
}
},
template: `<div class="footer">
<ul>
<li v-for="(item,index) in footerlist" :key="index">{{item}}</li>
</ul>
</div>`
})
const vm = app.mount("#app")
</script>
</body>
</html>

我是通过点击,然后修改 ifshowinfo,之后再将值传递给 shoptitle,但是我测试 watch 不起作用。

后来得到大佬的指点才知道。

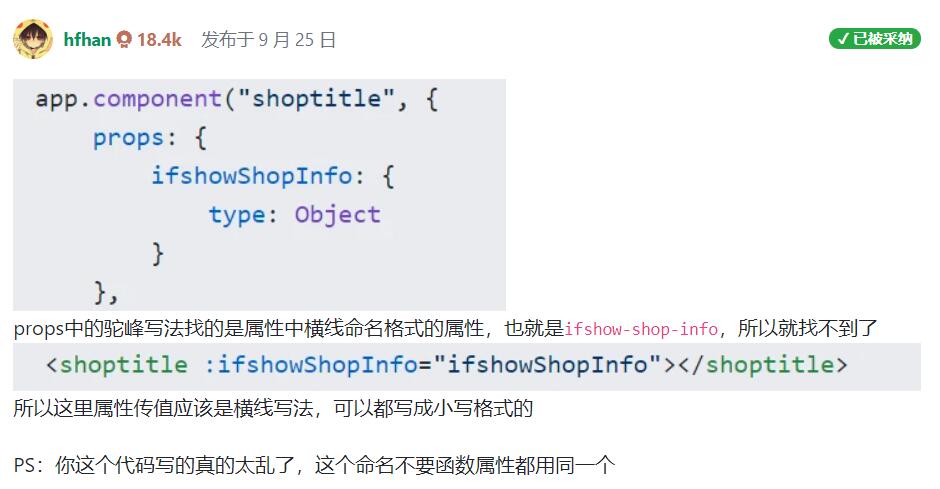
驼峰命名

Props 命名是有规则的,而不是自己想怎么命名就怎么命名。

vue3.0 子组件的props的值不随着父组件值的改变而改变该怎么解决?

这是我在学习 Vue 3.0 时遇到的一个问题,当时困扰了我好久好久。

我依稀记得应该是只要接受值,然后修改父组件的值,然后子组件就会跟着改变。

但是不管我怎么改都没有修改成功,最后在思否的问答区找到了答案。

我们需要传值的变量–>命名应该是小写才对,如果是像我这样 ifShowInfo 的话,是找不到这个值的,所以我们将它改成 ifshowinfo 就能找到值了,并且会随着父组件的值改变而改变。

1
2
3
4
5
6
7
8
9
10
11
12
13
14
15
16
17
18
19
20
21
22
23
24
25
26
27
28
29
30
<div id="app">
<h2 @click="Change">哈哈哈哈</h2>
<titles :ifshowinfo="ifshowinfo"></titles>
</div>
<script>
const app = Vue.createApp({
data() {
return {
ifshowinfo: false
}
},
methods: {
Change() {
this.ifshowinfo = !this.ifshowinfo
console.log(this.ifshowinfo)
}
}
})
app.component("titles", {
props: {
ifshowinfo: {
type: Boolean,
default: false
}
},
template: `<div>{{ifshowinfo}}</div>`

})
app.mount("#app")
</script>

vue练手小项目-Todolist

其实我觉得我跟todolist很有缘,在当时初接触php的时候,就学了一个用php写的todolist,现在写vue的时候,第一个练手的小项目也是todolist。
项目在线地址:https://www.datehoer.com/vue/todolist/#/
Github地址:https://github.com/datehoer/vue/tree/master/todolist

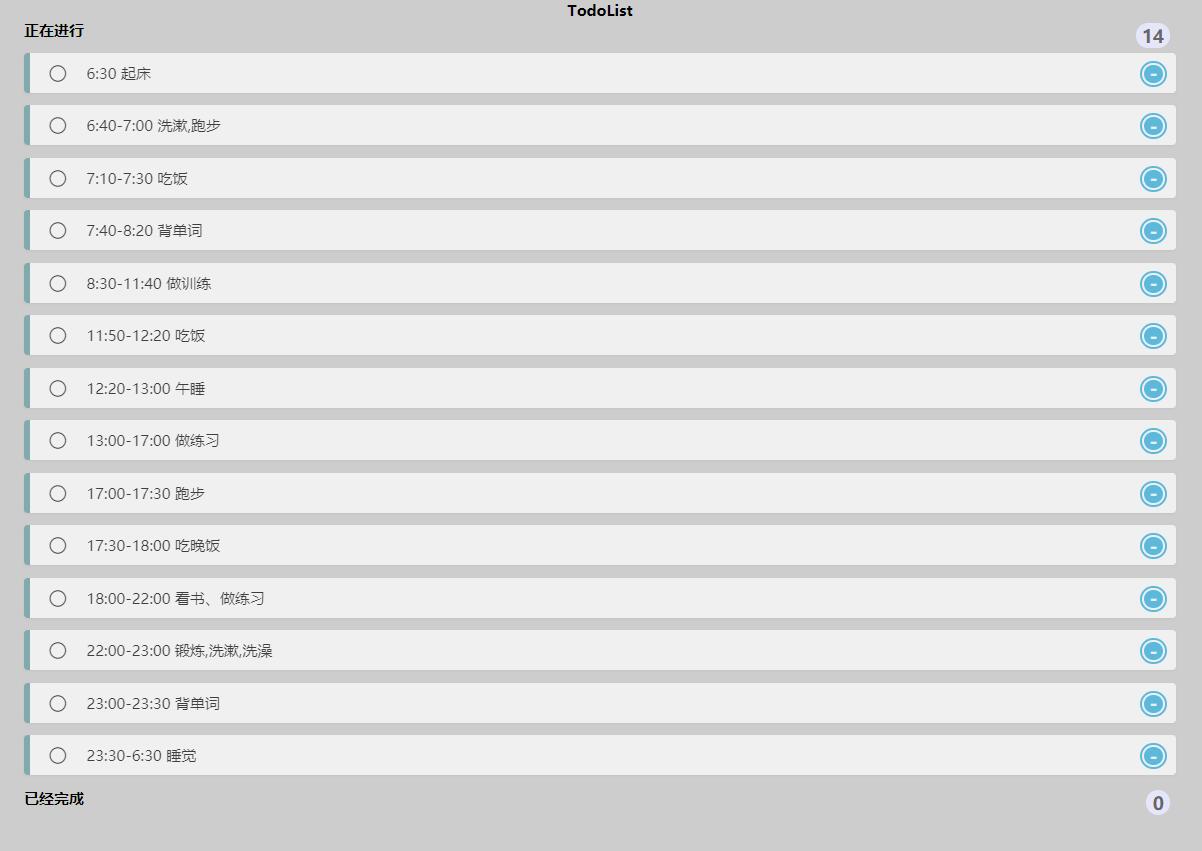
Todolist效果演示
上面的正在进行的任务是我写死的,这里可以修改成自己添加,不过我觉得还是写死比较好,因为我近期就这一个计划,然后设置了每天进行重置。

1
2
3
4
5
6
7
8
9
10
11
12
13
14
15
16
17
18
19
20
21
22
23
24
25
26
27
28
29
30
31
32
33
34
35
36
37
38
39
40
41
42
43
44
45
46
47
48
49
50
51
52
53
54
55
56
57
58
59
60
61
62
63
64
65
66
67
68
69
70
71
72
73
74
75
76
77
78
79
80
81
82
83
84
85
86
87
88
89
90
91
92
93
94
95
96
97
98
99
100
101
102
103
104
105
106
107
108
109
110
111
112
113
114
115
116
117
118
119
120
121
122
123
124
125
126
127
128
129
130
131
132
133
134
135
136
137
138
139
140
141
142
143
144
145
146
147
148
149
150
151
152
153
154
155
156
157
158
159
160
161
162
163
164
165
166
167
168
169
170
171
172
173
174
175
176
177
178
179
180
181
182
183
184
185
186
187
188
189
190
191
192
193
194
195
196
197
198
199
200
<template>
<div class="box">
<div class="header">
<h3>TodoList</h3>
<span @click="reset" title="点击重置Todolist">Reset</span>
</div>
<div class="content">
<div class="content_left content_box">
<div class="todo titlebox">正在进行<span class="tasknum">{{todolist.length}}</span></div>
<ul>
<li v-for="(item,index) in todolist" :key="index" :item="item" :index="index">
<span class="iconfont uncheck" @click="checkboxChange(index)">&#xe8bb;</span>
<p>{{item}}</p>
<a @click="tododel(index)">-</a>
</li>
</ul>
</div>
<div class="content_right content_box">
<div class="finish titlebox">已经完成<span class="tasknum">{{finishlist.length}}</span></div>
<ul>
<li v-for="(item,index) in finishlist" :key="index" :item="item" :index="index">
<span class="iconfont checked" @click="uncheckboxChange(index)">&#xe8ad;</span>
<p>{{item}}</p>
<a @click="finishdel(index)">-</a>
</li>
</ul>
</div>
</div>
<div class="footer">

</div>
</div>
</template>
<script>
export default {
name: 'Todo',
data() {
return {
todolist: ['6:30 起床', '6:40-7:00 洗漱10分钟,跑步10分钟', '7:10-7:30 吃饭','7:40-8:20 背单词','8:30-11:40 做训练','11:50-12:20 吃饭','12:20-13:00 午睡','13:00-17:00 做练习','17:00-17:30 跑步','17:30-18:00 吃晚饭','18:00-22:00 看书、做练习','22:00-23:00 锻炼、洗漱、洗澡','23:00-23:30 背单词','23:30-6:30 睡觉 (严格执行)'],
finishlist: [],
nowDate: 0
}
},
methods: {
checkboxChange(index) {
this.finishlist.push(this.todolist[index])
this.todolist.splice(index,1);
this.save()
},
uncheckboxChange(index) {
this.todolist.push(this.finishlist[index])
this.finishlist.splice(index,1);
this.save()
},
tododel(index) {
this.todolist.splice(index,1);
this.save()
},
finishdel(index) {
this.finishlist.splice(index,1);
this.save()
},
save() {
let day = new Date().getDate();
if(this.nowDate != day){
this.nowDate = day
this.todolist = ['6:30 起床', '6:40-7:00 洗漱,跑步', '7:10-7:30 吃饭','7:40-8:20 背单词','8:30-11:40 做训练','11:50-12:20 吃饭','12:20-13:00 午睡','13:00-17:00 做练习','17:00-17:30 跑步','17:30-18:00 吃晚饭','18:00-22:00 看书、做练习','22:00-23:00 锻炼,洗漱,洗澡','23:00-23:30 背单词','23:30-6:30 睡觉']
this.finishlist = []
}
localStorage.setItem('todolist',JSON.stringify(this.todolist))
localStorage.setItem('finishlist',JSON.stringify(this.finishlist))
localStorage.setItem('nowDate',JSON.stringify(this.nowDate))
},
reset() {
this.todolist = ['6:30 起床', '6:40-7:00 洗漱,跑步', '7:10-7:30 吃饭','7:40-8:20 背单词','8:30-11:40 做训练','11:50-12:20 吃饭','12:20-13:00 午睡','13:00-17:00 做练习','17:00-17:30 跑步','17:30-18:00 吃晚饭','18:00-22:00 看书、做练习','22:00-23:00 锻炼,洗漱,洗澡','23:00-23:30 背单词','23:30-6:30 睡觉']
this.finishlist = []
localStorage.setItem('todolist',JSON.stringify(this.todolist))
localStorage.setItem('finishlist',JSON.stringify(this.finishlist))
}
},
mounted() {
if(localStorage.todolist){
this.todolist = JSON.parse(localStorage.todolist)
}
if(localStorage.finishlist){
this.finishlist = JSON.parse(localStorage.finishlist)
}
if(localStorage.nowDate){
this.nowDate = JSON.parse(localStorage.nowDate)
}
this.save()
}
}
</script>
<style scope>
.box {
font-size: 10%;
display: flex;
width: 100%;
margin: 0 auto;
flex-wrap: wrap;
user-select: none;
}
.box .header {
width: 100%;
text-align: center;
}
.box .header span {
position: absolute;
top: 1%;
right: 1%;
color: rgb(68, 163, 187);
display: block;
width: 50px;
height: 50px;
line-height: 50px;
text-align: center;
background-color: yellow;
border-radius: 10px;
cursor: pointer;
}
.box .header span:hover {
background-color: tomato;
}
.box .content {
display: flex;
width: 100%;
justify-content: space-around;
flex-wrap: wrap;
}
.box .content .content_box {
width: 60%;
}
.box .content .content_box ul li {
display: flex;
height: 32px;
line-height: 32px;
background: #fff;
position: relative;
margin-bottom: 10px;
padding: 0 45px;
border-radius: 3px;
border-left: 5px solid #629A9C;
box-shadow: 0 1px 2px rgb(0 0 0 / 7%);
opacity: 0.7;
justify-content: flex-start;
align-items: center;
}
.box .content .content_box ul li .uncheck {
position: absolute;
top: 1px;
left: 14px;
width: 22px;
height: 22px;
cursor: pointer;
}
.box .content .content_box ul li .checked {
position: absolute;
top: 1px;
left: 14px;
width: 22px;
height: 22px;
cursor: pointer;
}
.box .content .content_box ul li a {
position: absolute;
top: 4px;
right: 5px;
display: inline-block;
width: 14px;
border-radius: 14px;
border: 6px double #FFF;
background: #2cb1e3;
line-height: 14px;
text-align: center;
color: #FFF;
font-weight: bold;
font-size: 14px;
cursor: pointer;
}
.box .content .content_box .titlebox {
position: relative;
margin-bottom: 10px;
font-weight: 600;
}
.box .content .content_box .tasknum {
position: absolute;
top: 2px;
right: 5px;
display: inline-block;
padding: 0 5px;
height: 20px;
border-radius: 20px;
background: #E6E6FA;
line-height: 22px;
text-align: center;
color: #666;
font-size: 14px;
}
</style>

项目我是通过vue-cli创建的,选择了router但是没有用上,并且我没有将内容进行拆分,其实可以拆成许多小的模板进行调用,但是没有拆。
其实这个小项目没有什么难度,只是练手而已,大家可以复制一下我的css样式,然后自己去简单敲一下就好了。

下面简单说一下如果不写死数据,我们在页面上写一个input框,然后加入回车事件,之后读取input框内的数据,将它push到todolist框内就可以了。

vue中的attribute和property分别是什么呢?

2021年的第一天,准备开始着手学习 Vue 了,主要其实还是为了拓展一下自己的知识面,再加上现在前端找工作,大多数都是要会 Vue 或者 React 的,所以准备趁着假期时间充足,学习一下 Vue 框架。

其实简单来说,Vue 的官方教程已经很明确了,但是毕竟人家是开发语言的,就算再怎么细致,也会有想不到的,就像我们想不到居然有人不会写 for 循环一样。 Vue 的官方文档

Vue 的官方文档写得非常详细了,但是还是有好多不懂的,比如说 Vue 中的 attribute 和 property。其实我也才看到实例部分,这个是边查边写的,主要是记录一下自己的学习状态。

vue中的attribute和property分别是什么

简单来说,attribute 和 property 分别是有关 HTML 中的内容。attribute 是元素标签的属性,而 property 则是元素对象的属性。实际上之所以会引出 attribute 和 property,是因为 Vue 可以直接修改 HTML 网页中的变量,比如说最简单的那个例子:

1
2
3
4
5
6
7
8
9
10
11
12
13
14
15
16
<div id="s1_on">
<p>{{message}}</p>
<input type="button" value="反转" v-on:click="rever">
</div>

var s1_on = new Vue({
el: "#s1_on",
data: {
message: "abcdefg"
},
methods: {
rever: function() {
this.message = this.message.split("").reverse().join("")
}
},
})

通过点击按钮使得本来已经设置的变量进行反转,这就是修改本来的值。当然其实说实在的,还是有更简单的,比如说我们直接在控制台输入创建的 Vue 的名字,后面跟上要修改的属性值,就能进行修改了。比如说我要修改 message,那么我可以直接使用 s1_on.message="asdasdad" 来进行修改。

而我们在 Vue 中对数据进行处理的时候,大多情况下都是默认的对 attribute 进行处理,而如果要对 property 进行处理的话,需要在后面加上 .prop

  • 变量作为 attribute 和 property 的 value 的绑定关系会在用户发生交互更新值后失效
  • Vue.js 一般使用 :value 即可让 value 作为 property
  • Vue.js 动态模版需要使用 :value.prop 才可让 value 作为 property

好了,今天的介绍就到这里了,如果想要知道更多的 Vue 的内容,推荐直接去 Vue 的官方文档进行查看。当然,如果有什么不会的也可以在评论区留言,我会在看到的第一时间进行回复的。